APTARE IT Analytics - Easy to Deploy and Configure

Veritas APTARE IT Analytics is the only IT analytics platform that offers unified insights for all major storage, backup, and virtual infrastructures through a single pane of glass both on-premises and in multicloud environments. It provides a clear view into the data center to help organizations identify underutilized IT resources and realize significant cost savings.
For any product you have not used before, the first question usually is how easy or difficult the product would be to deploy, configure and use. APTARE is an exception, however, and this blog will showcase how easy it is to deploy and configure APTARE 10.5 on VMware ESX using the Open Virtualization Format (OVF) file. This is one way to deploy APTARE, but you can also use the traditional deployment method.
How to deploy and configure APTARE 10.5 using Open Virtualization Format
- Download the APTARE OVA file from this location.
Once you’ve downloaded the file, deploy OVA on vCenter using the “Deploy OVF Template” option. Select the “OVF Template” either from a remote URL or a local filesystem. Provide a unique virtual machine (VM) name, the location of the VM, and the compute resource for this operation.

Figure 1. The Deployment of Review details page in APTARE.
After reviewing the details shown in Figure 1, select the storage location for the configuration of disk files. Before doing so, ensure the host has access to the selected data store.
- Next, select the network and network parameters for the VM. The DNS domain name you provide here will be used while accessing the APTARE portal (see Figure 2).
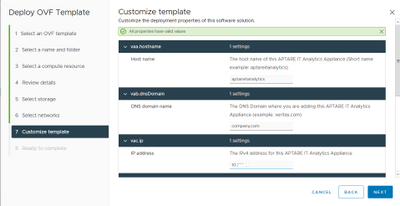
Figure 2. Input the host name, DNS domain name and IP address.
The DNS domain name you provide is used as a suffix when provisioning the APTARE portal. In this example, the APTARE portal URL will be https://aptareportal.company.com (see the URL in Figure 3).
- After all components are deployed, log in to the portal with the valid user name and password and navigate to the “Data Collection” page under the ADMIN tab. Now add “Collector” by selecting that option and adding all the relevant information. Next, you will see a popup message that talks about the key file used during DC installation for encrypting the subsystems.
Once you click “OK,” a file like DCName.key will download, where the DCName corresponds to the Data Collector name.
- The next step is to install the Data Collector. The data collector status in the APTARE portal is reported online after starting the DC services.
From the Data Collection option, choose the “Add Policy” task and select the policies you want (see Figure 3).
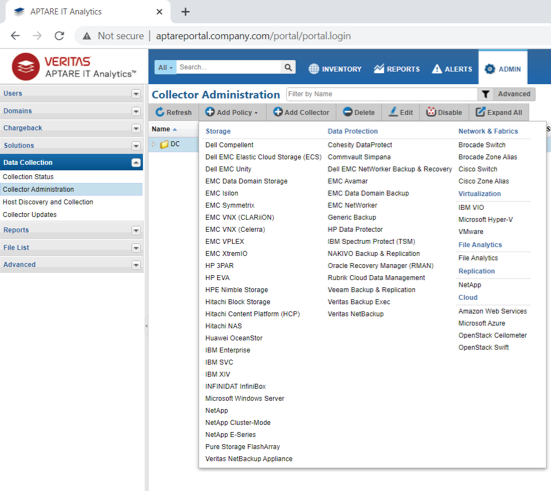
Figure 3. Adding policies for the data collector in APTARE.
APTARE supports two data collection methods for policy creation—one when the DC is installed on the same machine where NetBackup primary server is running and another when the DC and NetBackup primary server are installed on different machines. In the second method, communication occurs through the SSH or WMI protocol for Linux and Windows, respectively.
- You have now completed the last step of the deployment process. Finally, check the status of probes on the “Collection Status” page.
We hope this brief overview helps you realize how simple and easy it is to deploy and configure APTARE 10.5.
To learn more about the process, view this tutorial.
