Veritas & Seagate Lyve Cloud - MSDP Cloud Tier Best Practices

In a recent blog, Anthony Cusimano announced that Veritas has partnered with Seagate in their exciting new Lyve Cloud offering, which offers easy-to-use, cost-effective object storage.
Veritas is happy to announce launch support for Seagate Lyve Cloud with NetBackup. I thought I would take this time, to review some best practices to quickly get up and running with enterprise-grade deduplication to Seagate Lyve Cloud.
Here’s what you need to get started:
- Set up a Lyve Cloud Storage Account, consult the reference guide: (Lyve Cloud Quick Start Guide)
- Generate Access and Secret Keys for the storage account
- Set up the ability to read/write/list, create buckets and objects, and delete objects
- RHEL/CentOS 7.3+ Media server/ OR NetBackup Appliance
- NBU 8.3 (NBU Appliance 3.3.0.1) or higher with MSDP (Media Server Deduplication Pool) set up (video link)
- 1TB free space per storage tier
- Newest NetBackup CloudProvider.xml from here.
It’s easy to add a cloud tier to your existing MSDP storage server, in just a few minutes, and creating a Seagate Lyve Cloud account is a simple three-step process.
Configuring Lyve Cloud
It is assumed that a Lyve Cloud account has been created and configured. This consists of the following steps:
- Set up S3 Bucket
- Create Bucket permissions
- Create a service account – establishing access key, secret key, and associated URL for your account; see example below
Note: You must have at least one bucket with at least one associated permission before you can establish the credentials needed to add Lyve Cloud, as a Storage Tier in NetBackup.
Adding a Seagate Lyve Cloud Tier to MSDP
Step 1: Add Disk Pool
Go to the “Storage” section of the webUI, then under disk pools, select “Add” in the upper right-hand corner.
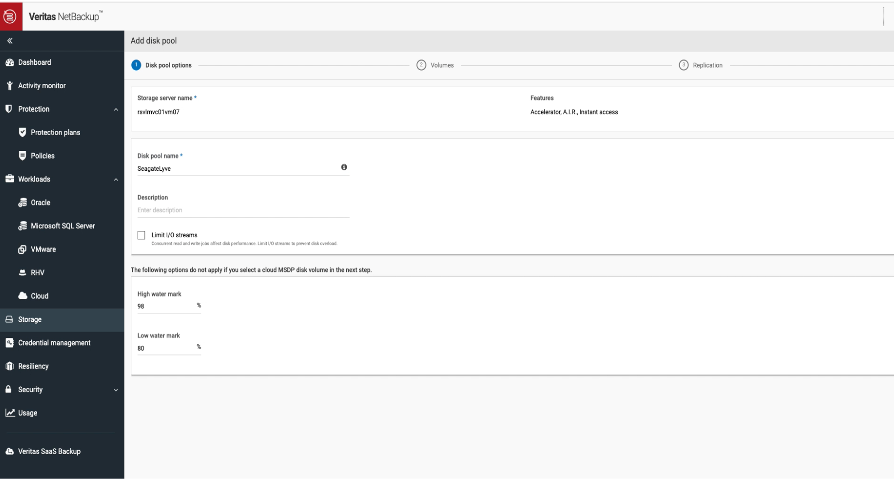
Step 1: Enter pool name, description, and then click next.
Step 2: Add Volume
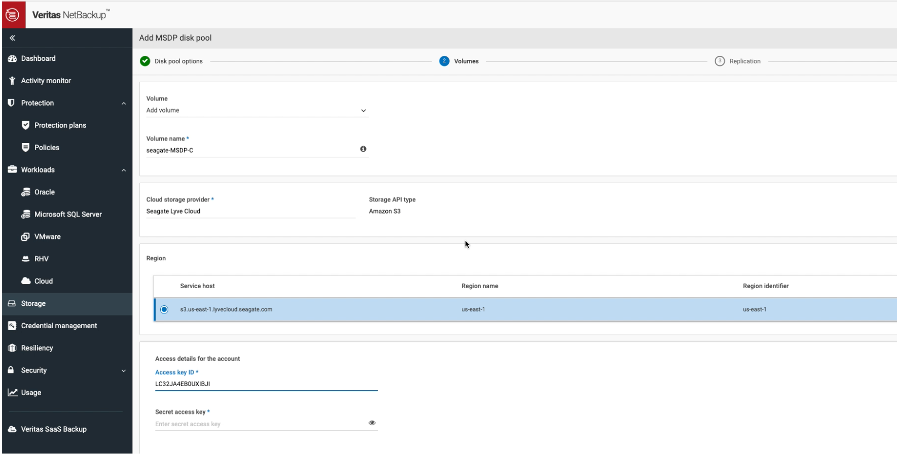
Step 2: Enter volume name, select Seagate Lyve Cloud as the provider, and Enter Access Key & Secret Key created in Lyve Storage Account
Step 3: Select or Create Bucket

Step 3: Select or add new bucket
Keep in mind that bucket names need to be all lowercase with no spaces.
The wizard will walk you through the remaining step of creating a storage unit. Once the storage unit is created, it can be used as a target for backups and duplication jobs.
Just a few simple steps and you’re writing to the cloud. For more detail on sending deduplicated data to object storage see my earlier blog post here. For more details on Seagate Lyve Cloud, go here.
